
1. Replacing Brake Levers
Video Tutorial: Brake Lever Replacement
Steps:
-
Remove the brake line from the lever (unscrew the silver screw).
-
Unscrew the washer and remove the brake line from the screw’s slit.
-
Unplug the brake sensor from the main connector.
-
Pull the grip off the handlebar, loosen the brake screw, and remove the lever. Install the new lever.
-
Tighten the screw and reattach the brake line.
-
Attach the washer and screw back in place.
-
Reconnect the brake sensor to the main connector and return the grip.
2. Replacing Brake Pads
Video Tutorial: Brake Pad Replacement
Removal:
-
Remove the brake from the tire (optional).
-
Bend the hook on your Xtech brake, pull out the pin.
-
Use tweezers or pliers to remove the brake pads.
Installation:
-
Align the brake pad with the metal clip.
-
Place the brake pad back and reinsert the pin.
-
Bend the hook to secure the pad.
3. Replacing Brake Calipers
Video Tutorial: Caliper Replacement (Roadrunner)
Steps:
-
Loosen the barrel adjuster screw to free the brake line. Remove metal cap if needed.
-
Unscrew the mounting bracket on the caliper.
-
Remove the caliper (keep the spring on the inner cable).
-
Run the existing brake cable through the new caliper.
-
Rescrew the mounting bracket to secure it.
-
Tighten the barrel adjuster screw.
-
Optional: replace metal cap for cosmetic purposes. Adjust brakes to preference.
4. Replacing Brake Cables
Video Tutorial: Brake Cable Replacement
Steps:
-
Remove front U-deck and left rear turn signal.
-
Unscrew the top screw of the left rear suspension to access the cable.
-
Pull the brake cable out.
-
Feed the new cable through the top left hole of the deck.
-
Route cable through rear and up through the left side of the stem.
-
Place cylinder pieces of inner cable into brake levers.
-
Reassemble U-deck, rear signal, and suspension.
-
Pull cable through brake calipers and adjust.
-
Reinstall cable covers and secure with zip ties.
5. Replacing Rotors
Video Tutorial: Rotor Replacement
Steps:
-
Remove the motor/rear wheel if replacing rear rotor: Motor/Rear Wheel Removal
-
Remove all 6 rotor screws and remove the rotor.
-
Install the new rotor (arrow pointing in wheel rotation direction).
-
Line up holes and secure all 6 screws.
Note: Do not change rotor size without changing the wheel; the front rotor must match its original wheel size.
6. Brake Adjustments
Tutorial Videos:
Common Adjustments:
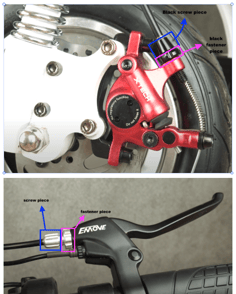
Wheel spins but pads not catching: Tighten brake cable via barrel adjuster. See picture below for reference.
Brake stops wheel but it still rotates with force: Adjust brake tightness using the black screw on cable or lever.
Rotor Issues:
-
Wobbly/Bent rotor: Check for damaged screws or a bent rotor; replace if needed.
-
Squeaky brakes: Usually caused by dirt/grease. Clean pads and rotors with soapy water. Do NOT use WD-40.
This guide ensures safe, effective brake maintenance for your EMOVE Cruiser. Always double-check connections and screws before riding.