
Installing a seat on your scooter is simple when you follow the correct steps. Here’s a clear guide to help you get it done safely and securely:
Step 1: Remove Deck Screws
Start by unscrewing the 4 screws located at the end of the deck. Keep the screws in a safe place, as you’ll need them to attach the base plate.
.png?width=375&height=255&name=1280X1280%20(4).png)
Step 2: Attach the Base Plate
Take the base plate and align it with the screw holes on the deck. Insert the screws through the plate and tighten them securely.
.png?width=437&height=261&name=1280X1280%20(5).png)
Step 3: Insert the Lock Clamp
Place the lock clamp into its designated position on the base plate. Make sure it sits firmly.
-1.png?width=474&height=262&name=1280X1280%20(6)-1.png)
Step 4: Secure with Mini Screw
Insert the mini screw into the lock clamp and tighten it. This ensures the clamp is fixed properly.
-1.png?width=444&height=254&name=1280X1280%20(7)-1.png)
Step 5: Install the Hydraulic Tube
Slide the hydraulic tube into the base plate. Tighten the clamp by rotating the latch and locking it in place. This secures the tube firmly.
.png?width=409&height=305&name=1280X1280%20(8).png)
Step 6: Position the Seat
Loosen the seat’s nuts and carefully place the seat onto the hydraulic tube. Confirm that the tube is fully inserted and aligned correctly.
.png?width=434&height=310&name=1280X1280%20(9).png)
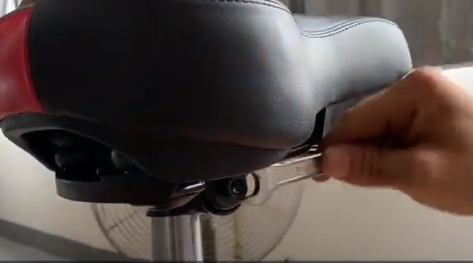
Step 7: Tighten the Seat Nuts
Finally, tighten the nuts on both sides of the seat to secure it. Double-check that the seat is stable and does not wobble.
Following these steps ensures a secure and comfortable seat installation, ready for safe riding.